Load Tracking
Load Tracking

The Load Tracking window:

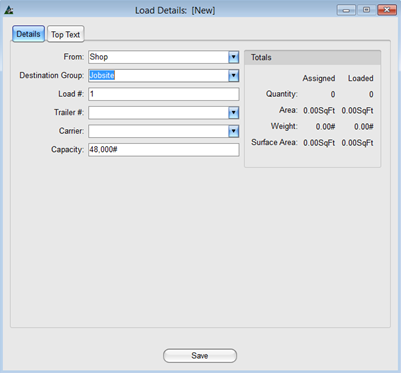
Click the ‘New Load’ button to start a new load. The ‘Load Details’ (New) window opens.

Click the drop down arrows to select a location the load is shipping from.
- From – Click the drop down arrow to select the location the load is shipping from
- Destination Group – Click the drop down arrow to select a load destination
- Load # - The load number automatically populates the load number
- Trailer # - Click the drop down arrow to select a Trailer #
- Carrier - Click the drop down arrow to select a Carrier
- Capacity – The Capacity automatically populates according to Load number and Trailer selections
When completed with data entry for the load, Click the ‘Save’ button at the bottom of the window, opening the ‘Load Details – Not Shipped’ window, now ready for adding Materials.
Load Tracking Maintenance
The fields for Trailer # and Carrier are optional. The trailer capacity and drop down arrow selections for Trailer # and Carrier are according to the setups in the Maintenance - Production Control Company Standards window for Load Tracking Settings.

The Load Tracking Settings window:

Click on the Top Tabs for Trailer #, Carrier, Load Categories, Shipped From and Date Received to add information for these fields to be used in the window for Load Tracking. Click to place a checkmark in the fields for ‘Show Field’ and/or ‘Value Required’ if selections are to show in the Production Control Load Tracking window.