CNC File Import
Not version-specific
Tekla PowerFab
Tekla PowerFab GO
This feature allows you to load the CNC files for the parts in a job into Tekla PowerFab. Information about the part is extracted from the CNC file and made available in the production control job. CNC files can be loaded into Tekla PowerFab during a production control import or manually from the job.
Loading CNC Files During Import
During the production control import process you will be prompted to select the directory that contains the CNC Files associated with the current import:
Image
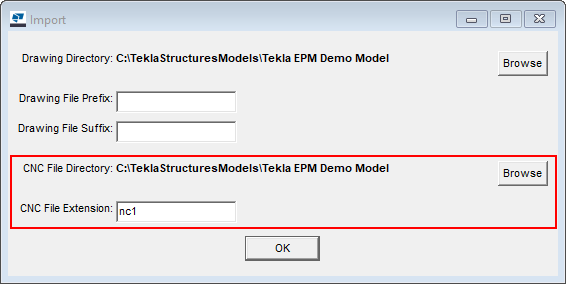
You must also enter the file extension of your CNC files if it is different than the existing value. Currently Tekla PowerFab can read DSTV or DXF files; the most common extensions are .nc1 and .dxf respectively. Select the directory that contains your CNC files and click OK.
During the import Tekla PowerFab will read all of the files in the directory you selected with that file extension. After the import is complete the CNC files will be compared against what was imported into the production control job. If any piece marks were in the import file but did not have a corresponding CNC file you will receive a warning message:
Image

The detailer’s job # is included in the DSTV file. If the job # of your production control job is different then you will receive the following prompt:
Image

- Use Current Job – Adds the file to the current job even though the job # is different.
- Use Current Job – All – Adds all files to the current job even though the job # is different.
- Don’t Use Current Job – Ignores this file.
- Don’t Use Current Job – All – Ignore all files with that job # in the DSTV file.
When CNC files are loaded into Tekla PowerFab (during an import or manually) each file is checked against the most recent version already in Tekla PowerFab for that piece mark. If the CNC file is exactly the same as the last version then it is not loaded again. The import log will show the files that have not changed.
If you load a set of files with revisions then only the files that are different than the last version will be added. The files that have not changed will not be added again.
To access the CNC files, open the production control job. Select the menu option Production Control > CNC Files.
Loading CNC Files Manually
If you did not load the CNC files during import you can load them manually from the production control job. Open the job and select the menu option Production Control > CNC Files. The CNC Files screen will open. Click the Load CNC Files button.
Image

Select the directory that contains the CNC files and enter the file extension if it is different than the existing value. Currently Tekla PowerFab will only read DSTV files and the most common extension is nc1. Select the directory with your CNC files and click OK.
You will then be prompted to enter a group name. When CNC files are loaded into Tekla PowerFab they are assigned to a group. This allows you to identify the CNC files that were loaded into Tekla PowerFab at the same time. When the files are loaded during an import the group name is set to the import filename. When loading files manually the group name defaults to the current date and time but you can enter anything you want.
Image

Click OK to load the files into Tekla PowerFab.
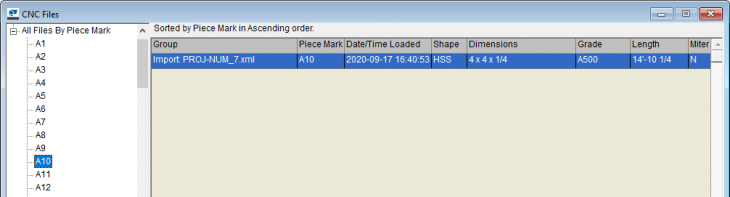
After the CNC files for a job have been loaded into Tekla PowerFab (during an import or manually) you can view them by selecting the menu option Production Control > CNC Files.
Image

When you select an item in the list the information extracted from the file will be displayed at the bottom of the screen:
- Miter Cut: Y/N – Indicates if the part has an angled cut.
- Holes: Number of holes in the part.
- Hole Diameter: Diameter of the holes. If the part has holes of different diameters then each diameter will be shown as well as the number of holes with that diameter. For example - Holes: 10, Hole Diameter: 13/16 (4), 15/16 (6)
- Bends: The number of bends.
- Camber: If the part is cambered then the camber details. For example - FlTop x=1 ½ indicates a 1.5” camber on the top flange.
View CNC Files
Tekla PowerFab does not have an integrated viewer. If you have a DSTV or DXF viewer installed on your computer then you can view the file. Select the file(s) in the table and click the View Selected Files button. Tekla PowerFab will open the file(s) with the program that Windows associates with the file's extension.
Save CNC Files
Tekla PowerFab stores the CNC files in the database. This makes them available from any computer. If you want access to the actual files you need to save them to your computer. Select the file(s) in the table that you want to save to your computer and click the Save Selected Files button. To save all files displayed in the table click the Save All Displayed Files button. You will then be prompted to select a directory to save the files. Select a directory and click OK.
CNC File Navigation Tree
On the left side of the CNC Files screen there is a navigation tree that allows you to view the files three different ways:
1. Latest Files By Piece Mark
As revisions are imported into your job you will end up with more than one CNC file for the revised piece marks. When you select Latest Files By Piece Mark in the tree only the latest version of each piece mark will be displayed. Click the plus (+) sign to expand the Latest Files By Piece Mark tree item and a list of piece marks will be displayed. Click on a piece mark to show the latest file for that piece mark.
Image

2. All Files By Group
Each time CNC files are loaded into Tekla PowerFab, whether it is done during an import or manually, a group is added for those files. Click the plus (+) sign to expand the All Files By Group tree item and a list of file groups will be displayed. Click the plus (+) sign to expand a group and a list of piece marks in that group will be displayed. When you select the All Files By Group tree item all CNC files for the job will be displayed in the table. Under All Files By Group, select a group to show only the files in that group. Under that group select a piece mark to show only the file in the selected group for that piece mark.
When you select a group under All Files By Group the Delete Group button at the bottom-right of the screen becomes available. If the group of files was loaded by mistake you can delete it here.
Image

3. All Files By Piece Mark
When a piece mark is revised it may be helpful to see the changes from one revision to the next. Click the plus (+) sign next to All Files By Piece Mark and a list of piece marks will be displayed. Select a piece mark and all CNC files loaded for that piece mark will be shown in the table. If you have a DSTV viewer installed on your computer you can easily view those files and identify the differences.
Image
Using Data From the CNC Files
Six new display fields are available for production control jobs that show data from the CNC files: Date Loaded, Miter Cut, Holes, Hole Diameter, Camber, and Bends. To add one or more of these fields:
- Select the menu option Maintenance > Production Control > Edit Display Fields.
- Click the Edit Types button.
- Scroll down the Not Included table to the CNC fields. Click on a field you want to add to the display and click the button with the right-pointing arrow (>).
- When you have finished adding fields click the Save button.
Image

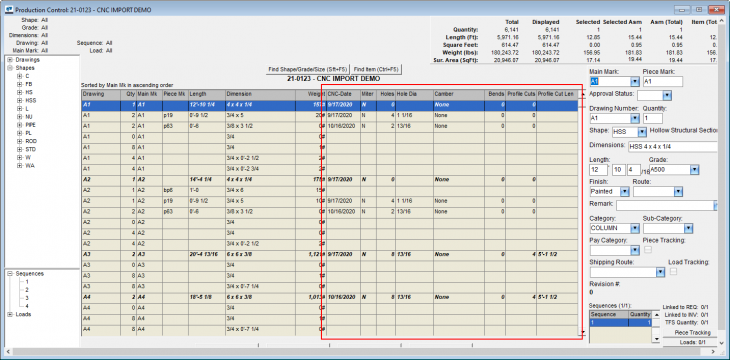
When you re-open the job the information from the CNC files will be displayed in those fields.
Image
Also, if a part has a miter cut then it will be shown with a bold M on shop cut list reports.
Image
