Update MySQL version for Tekla PowerFab
2023i
Tekla PowerFab
Tekla PowerFab GO
2023
Tekla PowerFab
Tekla PowerFab GO
2022i
Tekla PowerFab
Tekla PowerFab GO
2022
Tekla PowerFab
Tekla PowerFab GO
2021i
Tekla PowerFab
Tekla PowerFab GO
2021
Tekla PowerFab
Tekla PowerFab GO
2020i
Tekla PowerFab
Tekla PowerFab GO
2020
Tekla PowerFab
Tekla PowerFab GO
Tekla PowerFab officially supports MySQL up to version 8.0.35. In order to upgrade the MySQL version from 5.0.90, you must be running Tekla PowerFab 2020SP2 or later.
| Version | MySQL 8.0.35¹ | MySQL 5.7.41 | MySQL 5.7.29 | MySQL 5.6.36 | MySQL 5.0.90 |
|---|---|---|---|---|---|
| Tekla PowerFab 2024 | ✓ ² | ✓ | ✓ | ✓ | ✓ |
| Tekla PowerFab 2023i | ✓ ² | ✓ | ✓ | ✓ | ✓ |
| Tekla PowerFab 2023 | ✓ ² | ✓ | ✓ | ✓ | ✓ |
| Tekla EPM 2022i | ✓ ² | ✓ | ✓ | ✓ | ✓ |
| Tekla EPM 2022 | ✓ ² | ✓ | ✓ | ✓ | ✓ |
| Tekla EPM 2021i | ✓ | ✓ | ✓ | ✓ | |
| Tekla EPM 2021 | ✓ | ✓ | ✓ | ||
| Tekla EPM 2020i | ✓ | ✓ | ✓ | ||
| Tekla EPM 2020 | ✓ | ✓ | |||
|
¹ Use of MySQL 8 is restricted to 64-bit computers; 32-bit builds of MySQL 8 are not available. ² Tekla PowerFab 2024, Tekla PowerFab 2023iSP3, Tekla PowerFab 2023SP8, Tekla EPM 2022iSP9, Tekla EPM 2022iSP10, or greater is required for MySQL 8 support. |
|||||
It is advisable to update to the latest Tekla PowerFab version available prior to upgrading the MySQL version. It is also recommended — but not required — to Repair program errors and Compress the Tekla PowerFab database prior to backing up the database.
Option 1: Clean MySQL Update (Uninstall Old Version & Fresh Install New)
- Make sure that all users have logged out of Tekla PowerFab and ensure no users will login until the upgrade is complete.
- Locate the installer for the MySQL version you are wanting to install. In the default install location of the Default Directories for Backup (
C:\Users\Public\Documents\Tekla\Backup) there should be amysql_setup_<version>.exe. If you do not have the installer version you are wanting, please Contact Support to provide it. - On the server, open Tekla PowerFab as an administrator.
- Recommended, but Optional: Repair program errors.
- Recommended, but Optional: Compress the Tekla PowerFab database.
- Save a backup copy of the Tekla PowerFab database. (Do not save this to the MySQL install location.)
- Exit PowerFab.
- Open the Windows Services application, locate the MySQL service for the PowerFab database and Stop the Service. Depending on what version you started with, the Service may be MySQL_TeklaPowerFab, MySQL_TeklaEPM, MySQL_Fabsuite. The service name can be customized with the MySQL Service Manager, so it could be anything.
- Optional: Uninstall current version of MySQL. Run
uninstall.exefrom the MySQL install location. This typically isC:\mysql\but could have been customized. - Install MySQL version by running the
mysql_setup_<version>.exe.located in step #2. If you are installing a second instance of the MySQL program, you will need to specify a new default directory — for exampleC:\MySQL8. Running themysql_setup_8.exeprovided by Trimble will create a new MySQL_TeklaPowerFab service on port 3306. - Open the new service in Tekla PowerFab as an administrator.
- Restore the Tekla PowerFab database using the database backup created in step #6.
- Recreate the Tekla PowerFab Remote Server service:
- Open the Tekla PowerFab Remote Monitor. This can be located in the PowerFab install directory and the application name
Tekla.PowerFab.Remote.Monitor.exe. - Remove the existing service by ensuring it is selected in the dropdown menu and clicking the - button.
- Create a new service by clicking the + button. The service dependency should be MySQL_TeklaPowerFab.
- Open the Tekla PowerFab Remote Monitor. This can be located in the PowerFab install directory and the application name
- Set up and start Tekla PowerFab Remote Server.
After completing all these steps, users can log back into Tekla PowerFab Office and Go.
Option 2: Upgrade with MySQL_Upgrade Utility
Users that do not wish to uninstall the existing MySQL version and install the new version, can use the MySQL_Upgrade.exe utility.
- Make sure that all users have logged out of Tekla PowerFab and ensure no users will login until the upgrade is complete. See View currently signed-in users and Force shutdown.
- Download and extract the desired
mysql-upgrade-<version>.exefrom MySQL Upgrade for Tekla PowerFab on the Tekla Warehouse. - On the server, open Tekla PowerFab as an administrator.
- Recommended, but Optional: Repair program errors.
- Recommended, but Optional: Compress the Tekla PowerFab database.
- Save a backup copy of the Tekla PowerFab database. (Do not save this to the MySQL install location.)
- Open Windows Explorer and browse into the Tekla PowerFab program installation directory. The default location is:
C:\Program Files\Tekla\Tekla PowerFab. - Close all Tekla PowerFab instances including Tekla Remote Monitor and MySQL Service Manager.
- Launch
MySQL_Upgrade.exefrom the Tekla PowerFab program installation directory. The default location is:C:\Program Files\Tekla\Tekla PowerFab.Image
- Click the button on the right of the Upgrade Installer input to open the file selection window, then select the
mysql-upgrade-<version>.exefile that was obtained in step #2.Image
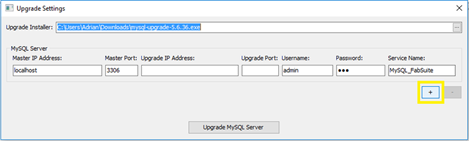
- Below under the MySQL Server section enter the following information:
- Master IP Address - Leave this as: localhost
- Master Port - The default port for MySQL is
3306, change this setting only if you have specifically set MySQL to run on a different port. - Upgrade IP Address & Upgrade Port - These are rarely used and should be left blank unless instructed otherwise by technical support.
- Username & Password - Enter the credentials of a Tekla PowerFab user with administrator permissions.
- Service Name - This is the name of the Windows service that manages the MySQL process. The default service name when Tekla PowerFab installs MySQL is
MySQL_TeklaPowerFab. Depending on what version you started with, the Service may beMySQL_TeklaPowerFab,MySQL_TeklaEPM,MySQL_Fabsuite. The service name can be customized with the MySQL Service Manager, so it could be anything.
- Some users install a second MySQL service on the same server, utilizing the same set of MySQL executables but working off different data directories and listening on a different port. If this is the case with your system then that additional service must be added to the Upgrade Settings so that both data directories will be upgraded. If another MySQL service is running using the same set of MySQL executables and it is not specified in these settings then either the upgrade will fail or that second MySQL service will no longer operate correctly.
- Click on the + button to add an additional set of MySQL Server entries.
Image
- Enter the Master IP Address,
Master Port, Username, Password, and Service Name inputs as necessary for the second service.Image
- Repeat these steps for any additional MySQL services that operate from the same set of MySQL executables.
- Click on the + button to add an additional set of MySQL Server entries.
- When you have finished entering the settings click the Upgrade MySQL Server button to begin the upgrade.
Image

- At this point the Upgrade Settings screen will close and status messages will be displayed as the upgrade procedure proceeds.
Image

- The upgrade steps will all be completed without any further action required by the user.
The automatically completed steps are:
- Check the settings that were entered on the previous screen
- Perform a database backup
- Stop the MySQL service
- Copy in the files for the new version of MySQL
- Adjust MySQL configuration settings
- Start the MySQL service
- Restore the database
- Complete the upgrade of the data files
- When the upgrade has completed an 'Upgrade completed!' message will appear on the status window. The upgrade program can now be safely closed and you may now open and log into Tekla PowerFab.
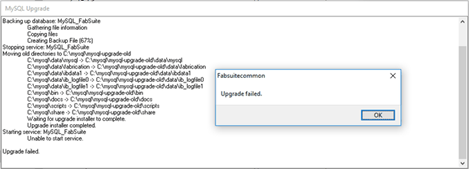
Failed Upgrades
If the upgrade were to fail for some reason a message box will appear with the text "Update Failed."
Image
Click OK on that message and another message will appear indicating that the upgrade will be rolled back to its previous state:
Image
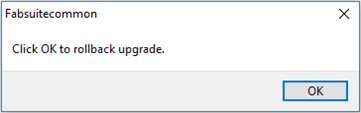
Click OK to proceed with the rollback. Every step that had been taken up to that point will be reversed, leaving the MySQL in the same state as it was prior to the upgrade, and the Upgrade Settings screen will re-appear.
Image

You can then adjust any necessary settings and try the upgrade again or contact technical support for further assistance.