Create, modify, and delete automated events

Tekla PowerFab
2020
Tekla PowerFab Tekla PowerFab GO

Create, modify, and delete automated events

By creating automated events, you can receive automatic reports from Tekla EPM either on demand or automatically according to a set schedule. For example, automatic reports can be useful when you want to stay up to date on the progress of a project. You can choose to receive the reports by email, or save them in a particular folder.

  1. Click the Maintenance ribbon tab.
  2. In the menu, select Automated Events.

The Automated Events dialog box opens.

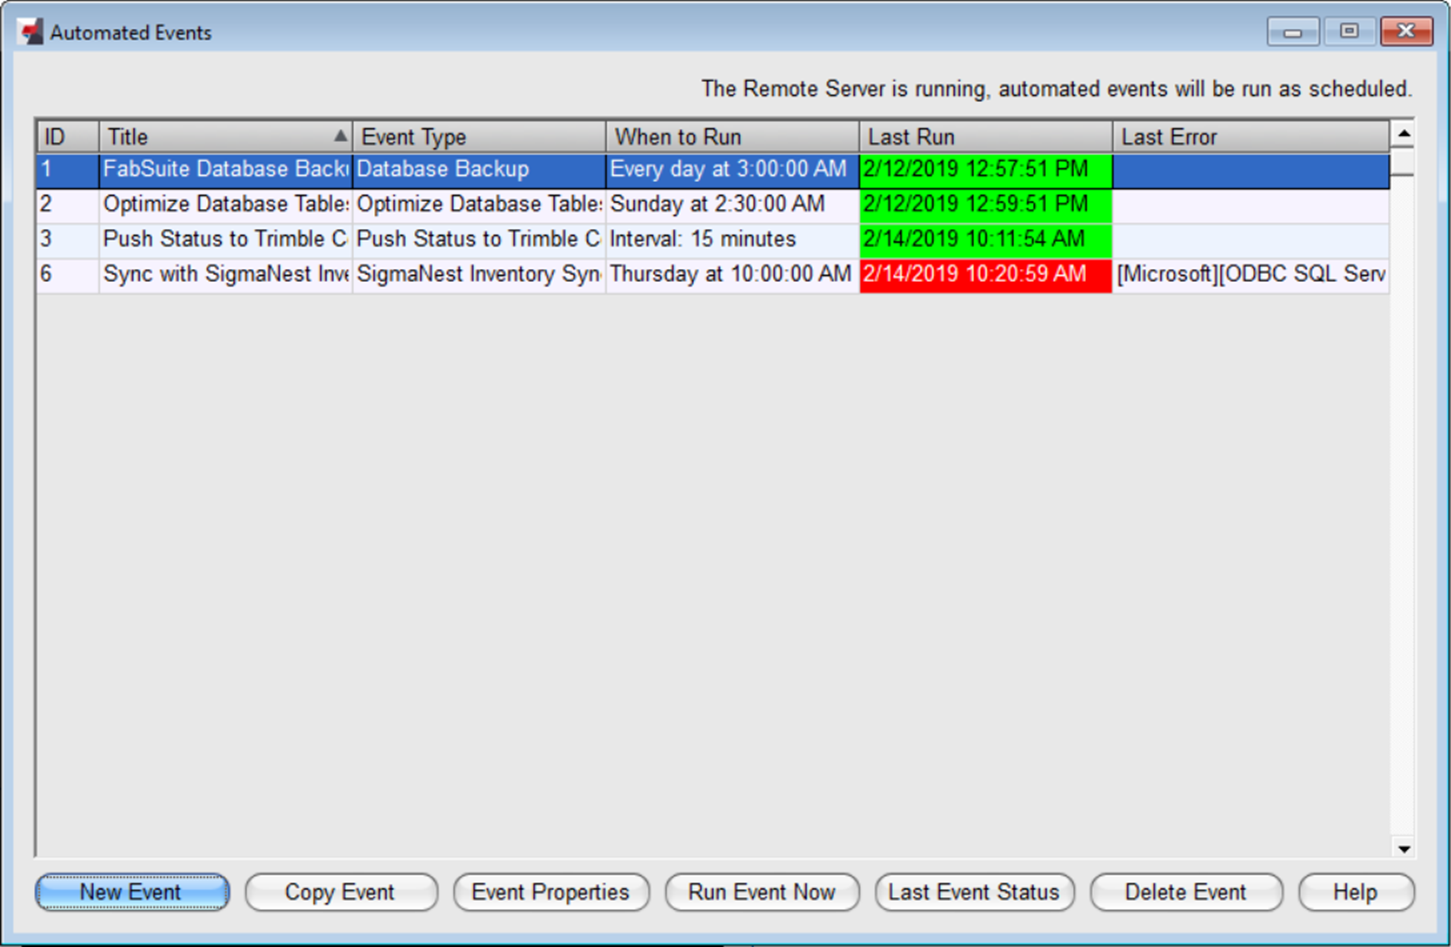
Note that the Tekla EPM Remote Server must be running in order for automated events to run as scheduled. For more information on starting the Tekla EPM Remote Server, see Set up the Tekla EPM Remote Server.

If the Tekla EPM Remote Server is running normally, the message at the top of the dialog box is black.

If the Tekla EPM Remote Server is not running, the message at the top of the dialog box is highlighted in red and warns you that automated events will not be run as scheduled.

Define the outgoing email settings

You need to define the outgoing email settings to receive automatic reports or failure notifications by email.

  1. In the dialog box, click the Automated Events ribbon tab.
  2. In the menu, select Outgoing Email Settings.
  3. On the Outgoing SMTP Server tab of the Automated Event Email Settings dialog box, select the Enable Outgoing Email check box.
  4. Define the host, port, username, password, and sender name and email address.
  5. To test the outgoing email server settings, click Test.
  6. On the Failure Notifications tab, type the email addresses to which you want to send failure notifications.
  7. Click Save to save the settings.

Create an automated event

  1. In the Automated Events dialog box, click New Event.
  2. In the Automated Event Details dialog box, type a title and a description for the event.
  3. In the Event Type list, select what type of event you are creating.

    For example, to receive reports on the progress of a project, select the Report event type.

    Note that users cannot add or modify event types.

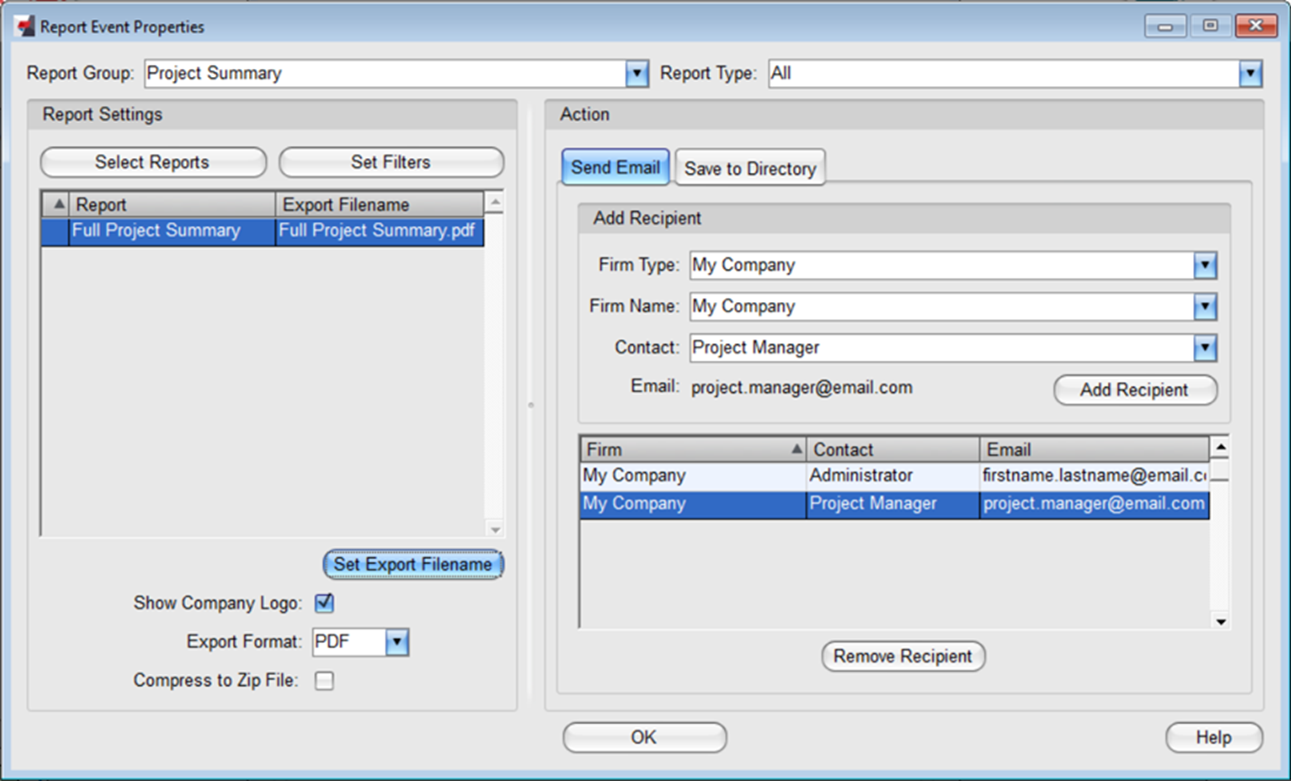
  4. If you have created a report event, define the event properties as follows:
    1. Click the Event Properties button.

      The Report Event Properties dialog box opens.

    2. In the Report Group list at the top of the Report Event Properties dialog box, select which group the reports that you want to save or send belong to.
    3. Select the report list that contains the desired report.
    4. Click the Select Reports button.
    5. In the Select Reports dialog box, click the arrow buttons to move the reports that you want to include in the automated event to the Included list.
    6. Click OK.

      The selected reports are added to the list on the left.

    7. If you want to filter the reports to only include particular items, click Set Filters.
    8. If you want to change the name of the report file, click Set Export Filename, type the desired name, and click OK.

      You can view the placeholders available for file names and directories on the Save to Directory of the Report Event Properties dialog box. You can use these placeholders in the file names of reports to ensure that other files are not overwritten and that the event does not fail because a report with the same file name is open.

    9. At the bottom of the dialog box, select if you want to show the company logo in the report files, and if you want to compress the reports into a .zip file.
    10. In the Export Format list, select if you want to send or save the reports as PDF files, Microsoft Excel worksheets, or text files.
    11. To send the report by email, on the Send Email tab, select firm type, company name, and contact person, and click Add Recipient.

      You can add more recipients by selecting a new firm type, company name, and contact person, and clicking Add Recipient again.

      Note that the company and contact person need to exist in the Address Book. The contact person also needs to have an email address in the Address Book.

    12. To save the report in a folder, on the Save to Directory tab, click the ... button, select the folder where you want to save the file, and click OK.
    13. To save the settings of the report event, click OK at the bottom of the Report Event Properties dialog box.
  5. Set the reporting frequency:

    To

    Do this

    Create an automated event that repeats with a particular interval

    1. In the Repeat Type list, select Interval.

      The Interval tab opens, allowing you to define the desired interval.

    2. In the Interval Units list, select if the interval is measured in hours, days, or weeks.

    3. In the Value field, type the number of hours, days, or weeks.

    Create an automated event that repeats on particular days of the week

    1. In the Repeat Type list, select Scheduled.

      The Scheduled tab opens on the bottom half of the dialog box, allowing you to define the schedule.

    2. Click Add.

    3. In the Schedule on list at the top of the Automated Event Schedule, select Day of Week.

      The Day of Week tab opens.

    4. Select check boxes next to the days when you want to run the automated event.

    5. In the Run At lists, select the time when your want to run the report.

    6. Click Save to save the event schedule.

    The Automated Event Schedule dialog box closes.

    Create an automated event that repeats on a particular day of the month

    1. In the Repeat Type list, select Scheduled.

      The Scheduled tab opens, allowing you to define the schedule.

    2. Click Add

    3. In the Schedule on list at the top of the Automated Event Schedule, select Day of Month.

      The Day of Month tab opens.

    4. Define the day number.

      If you type 31, the automated event runs on the last date of each month, including the months with less than 31 days.

    5. In the Run At lists, select the time when your want to run the report.

    6. Click Save to save the event schedule.

    The Automated Event Schedule dialog box closes.

  6. Click Save to create the automated event.

Example: Create a Trimble Connect Sync event


Run an automated event manually

  1. In the Automated Events dialog box, select the automated event that you want to run.
  2. Click Run Event Now.
  3. To confirm running the event, click Yes in the confirmation dialog box.

    The event is run. Note that the event ID is highlighted with yellow in the Automated Events dialog box.

    The Status dialog box opens, showing the progress of the event.

  4. When the event has been run, click OK to close the Status dialog box.

If the event has been run successfully, the Last Run column displays the latest run time on a green background.

You can view the details of the last run by clicking the Last Event Status button.

Copy an automated event

  1. In the Automated Events dialog box, select the automated event that you want to copy.
  2. Click Copy Event.
  3. In the Automated Event Details dialog box, type a title and a description for the copied event.
  4. Modify any other event properties according to your needs.
  5. Click Save to save the properties of the copied event.

Modify an automated event

  1. In the Automated Events dialog box, select the automated event that you want to modify.
  2. Click Event Properties.
  3. In the Automated Event Details dialog box, modify the title and the description for the event.
  4. In the Event Type list, change the type of event according to your needs.
  5. If you are modifying a report event, modify the event properties as follows:
    1. Click the Event Properties button.

      The Report Event Properties dialog box opens.

    2. In the Report Group list at the top of the Report Event Properties dialog box, select which group the reports that you want to save or send belong to.
    3. If you want to use a customized report list, select the report list in the Report Type list.
    4. Click the Select Reports button.
    5. In the Select Reports dialog box, click the arrow buttons to move the reports that you want to include in the automated event to the Included list.
    6. Click OK.
    7. If you want to filter the reports to only include particular items, click Set Filters.
    8. If you want to change the name of the report file, click Set Export Filename, type the desired name, and click OK.
    9. At the bottom of the dialog box, select if you want to show the company logo in the report files, and if you want to compress the reports into a .zip file.
    10. In the Export Format list, select if you want to send or save the reports as PDF files or Microsoft Excel worksheets.
    11. To modify the recipients of the report, on the Send Email tab, do either of the following:
      • To add a new recipient, select the firm type, company name, and contact person, and click Add Recipient.

        You can add more recipients by selecting a new firm type, company name, and contact person, and clicking Add Recipient again.

        Note that the company and contact need to exist in the Address Book. The contact person also needs to have an email address in the Address Book.

      • To delete recipients, click the Remove Recipient button.

    12. To change the save location of the report, on the Save to Directory tab, click the ... button, select the folder where you want to save the file, and click OK.
    13. To save the settings of the report event, click OK at the bottom of the Report Event Properties dialog box.
  6. Modify the reporting frequency.
  7. Click Save to update the automated event.

View the run history of an automated event

  1. In the Automated Events dialog box, select the automated event whose entire run history you want to view.
  2. Click Event Properties.
  3. In the Automated Event Details dialog box, click Result History.
  4. In the Results dialog box, review the result history of the automated event.

    If an error has occurred during a run, the Error Message column of the run is highlighted in red, and a brief description of the error is displayed.

  5. To view more details about a particular run and its errors, select the run and click Details.
  6. To close the Results dialog box, click the Close button (X) in the upper-right corner.

Delete an automated event

Note that deleting an automated event is permanent and cannot be undone.

  1. In the Automated Events dialog box, select the automated event that you want to delete.
  2. Click Delete Event.
  3. To permanently delete the automated event, click Yes in the confirmation dialog box.
Was this helpful?
Previous
Next